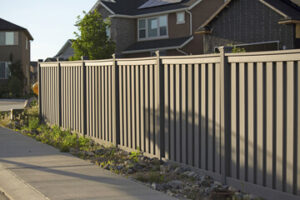
Fencing is a great way to delineate property boundaries, keep pets and kids in yards, and keep unwanted wildlife out. But installing a fence is a big project that requires careful planning and knowledge of local regulations.
Labor costs saddle up the bulk of fence installation expenses. Fence height, material type, and the quirks of the terrain all ratchet up labor rates.
As with any home construction project, preparation is key to ensure a successful installation. This is especially true when installing a fence. The following tips can help prepare your yard for the installation process and make the job easier for both you and the contractor.
Clear the area where your new fence will be installed. This includes removing debris, plants, logs, or anything else that could interfere with the crew’s ability to build your fence. It’s important to also prepare the space by digging and driving post holes in accordance with the planned layout of your fence.
Check for and locate local underground utilities. It’s always a good idea to do this before any excavation work begins as it can prevent damage from occurring during the building of your fence. Whether it’s sprinklers, gas lines to fire pits, or perimeter electrical wiring, these local utilities can easily be damaged if they’re not found. Locating these elements is easy, and can be done with the help of a utility locator.
Find your property line(s). If you’re unsure where your property lines are, it’s a good idea to contact a surveyor for help. This will give you an accurate understanding of your boundaries so that your fence doesn’t encroach on someone else’s land. As a result, it will avoid any legal issues down the road.
Get a permit for your fence installation. This is necessary to ensure that all of the proper regulations are followed and that your work complies with local law. Getting this step out of the way will save you time, money, and hassle down the road.
Talk to your neighbors about your plans for a fence. This can be a great way to foster good relationships with your neighbors and ensure that they’re comfortable with the project taking place in their backyard. This is an especially important step if your fence will be built near to or on a shared driveway.
Post Installation
Once the soil has been prepped and any necessary utilities located, it’s time to dig your fence post holes. For wood posts, the general rule is to bury them at least three feet into the ground (4 feet at stress points). It’s important that all posts are properly set and securely anchored in order to ensure the longevity of your fence.
Using a manual post hole digger or auger, dig each hole at least twice the width of the post and about a third of the height of the post. This will give the concrete sufficient support. For concrete posts, it’s also a good idea to place a small amount of gravel at the bottom of each hole. This will help drain water away from the post and prevent rot, extending the life of your fence.
When ready to install your posts, start with the corner or end posts first. This will provide extra bracing to help support the rest of your fence and make it more stable in windy or rainy weather conditions.
Then, install the remainder of your posts in a straight line. To guarantee that all your posts are perfectly level and aligned, use a string guide to map out the route of your fence, stepping down from the top of one post to the bottom of another. This technique will help you map out your layout and save you time when installing the actual fence panels later on.
For concrete posts, after the initial set, tamp down each post and then build a mound at the base of the post to eliminate water standing at the bottom of the post. You may also want to slope the concrete slightly away from the post, directing the water to other areas to avoid moisture damage, extending the life of your fence.
Once the concrete is poured, use a stick to remove any air bubbles and to tamp down the concrete. You can also choose to add a coat of stain or sealer after the concrete has dried to protect the wood from moisture and prolong its life.
Panel Installation
The fence installation process requires attention to detail and precision. This ensures that the fence sits firmly and looks great. Getting professional help in this stage can save time and reduce errors. It also increases the longevity of the fence, making it a sound investment.
Before starting the project, survey the area and determine the exact location of the fence posts and any gates. This will help you avoid any issues with your neighbours. You should also check with your community and utility companies to find out about any zoning restrictions or buried utility lines. You can use a cable locator to identify any underground wires or pipes before digging. If you’re installing a wood fence, it’s essential to communicate with your neighbours before the installation process starts. This will avoid any disputes over property boundaries and ensure everyone is on the same page with respect to zoning requirements.
Once you have the aforementioned details sorted, you can start digging post holes for your fence. Then, set the end posts and any gate posts in concrete. Once these are set, it’s time to start installing the fence panels. Make sure that you follow the instructions provided by your manufacturer, as there may be some additional steps involved in the process.
When lifting the fence panels, remember to bend your knees and use a team lift approach to prevent back strain. It’s also important to wear proper safety gear. This includes gloves, eye protection and a hard hat. This will protect you from any splinters or cuts, as well as debris from the installation site. It’s also important to use a spirit level to ensure that each panel is at the same height. This will create a uniform appearance and enhance security.
To install the first continuous fence panel, insert connectors in each of the lower bars of the post. Next, place the panel on the connectors and tack weld it in 3 places. When you’re done with the first panel, pick up the next panel and slide it onto the connectors as close to the welded tit as possible. Repeat the process with the remaining panels until your fence is complete.
Gate Installation
A gate is a crucial element of any fence installation project. It allows you to enter and exit your yard and gives a finished look to your fence. Before you begin gate installation, you must consider many factors. This includes deciding where you want the gate to be installed, what size it will be, and whether it will swing inwards or outwards. It is also important to think about what type of gate latch you will use. Once you have determined these factors, you can move on to preparing the site and installing the posts and frame for the gate.
Before you dig any holes for your gate posts, check for pipes and other utility lines. This will ensure that you do not accidentally cut or break any cables or wires, which can cause costly repairs and delays while you make the necessary repairs. The best way to do this is by calling the local utility company to have them come out and mark where any lines are located in your area.
Once you have marked the spots where you want to install your gate fence posts, dig the holes according to the specifications that you or your chosen contractor has provided. It is recommended that you set the posts in concrete footings for added stability. These footings should be at least as deep as the height of your post in order to provide adequate support for your gate.
After digging the holes, you will need to build a base for your gate posts. This is important because it will help to keep your gate posts stable and prevent them from sagging over time. To create a base for your gates, dig a trench across the area and then place in some pressure treated 2″ x 4″ boards. These can be nailed to the posts and then filled with gravel.
When you have prepared the bases for your gate posts, you will need to add some additional reinforcement for the hinges. This will help to reduce the amount of stress that is placed on these areas, which can ultimately lead to sagging or even failure of the gates. To do this, simply drill a hole into the hinge side of the post and then into the beginning of both ends of the brace post.